How to install Microsoft Windows 98.
Question:
How to install Microsoft Windows 98.
Answer:
Below are the steps required to install the standard version of Microsoft Windows 98 and the Second Edition of Windows 98. It is important to realize that some computer manufacturers may have their own install of Windows 98, therefore the below steps may not all apply to how Windows 98 is installed on your computer. If the below steps do not apply to your computer's setup of Windows 98 and you are unable to determine how to install Windows, it is recommended you contact your computer manufacturer for additional help; Computer Hope will not how to install Windows using your manufacturer CD.
If you have not already, you may wish to read through document CH000186 for additional information about erasing your hard disk drive and starting over.
From the MS-DOS prompt, switch to the CD-ROM drive; commonly this is the D: drive. Additional information about switching drives in MS-DOS can be found on document CH000515.
Once in the CD-ROM drive, type cd win98 and press enter.
Once in the WIN98 directory, type setup and press enter.
Press Enter to start the check and this should start the Microsoft Windows 98 setup installation. Microsoft Windows 98 will start by checking the hard disk drive for any errors; once completed, press the Continue button to start the installation.
If you agree with the Microsoft Windows 98 license agreement, check I accept the Agreement and click the Next button.
If you are installing Windows 98 SE, Insert your Microsoft Windows 98 SE product key. If you have lost this key, please see document CH000156.
If you are using the Microsoft Windows 98 SE upgrade CD, you may be prompted to insert the original Windows 98 CD or point to the Windows 98 setup at this point.
Windows 98 will then prompt you to where you wish to install Windows 98. Unless you wish for a different directory, leave it at the default C:\Windows directory and click Next.
Choose the Type of Setup you wish to do; most users will wish to remain with the Typical setup. Once the setup has been selected, click the Next button. If you have chosen a setup other than Typical, the below steps may not all apply to your setup.
Choose Install the most common components (Recommended) and click Next.
Enter the computer's Identification, if you do not plan on connecting to the computer to a network you can leave the default data and click Next. This information can also be entered later.
Enter your location and click Next.
Click Next to create a startup disk.
If you do not wish to create a startup disk, Click Cancel, otherwise put a blank diskette in the computer and click Ok.
Click Ok when prompted to remove the disk.
Click Next to start copying files.
Once ready, click Okto restart the computer. Make sure if any diskette is in the computer that it is removed from the computer.
If you are installing the original Windows 98, you may be prompted for the Product key after the computer restarts; insert your Windows 98 product key and click Next. If you have lost this key, please see document CH000156.
Continue through the remainder of the setup answering each of the questions.
If you have a connection to the Internet it is recommended that you download and update all the Microsoft Windows updates and critical updates to get your computer running more smoothly and to help protect it from any potential risks. Additional information about updating your Windows computer can be found on document CH000545.
Sunday, December 2, 2007
Assignment#2
To perform a new install of Windows XP:
Insert your XP CD in the drive. It should automatically launch the Setup routine. If it doesn't, click Start -> Run, type d:\setup.exe (where d: is the letter of your CD drive) in the Open box and click OK.
You'll be presented with a menu of choices. Click Install Windows.
The first setup screen asks you what type of installation to perform. Select New Installation (Advanced) from the drop-down list and click the Next button to move to the next screen.
Read through the licence agreement and, if you accept it, click I Accept This Agreement, then click Next.
Type in your Windows Product Key, which you'll find on the CD cover, then click Next.
The next screen lets you choose from a variety of options. If you'd like to copy all the installation files to your hard drive (which increases the speed of the installation and makes it easy to reinstall at a later point, but will chew up some 500 megabytes of hard disk space) or you'd like to choose the drive and partition where XP is installed (which you must do if you intend to dual boot, otherwise you'll trash the existing installation), click the Advanced Options button. If you are visually disabled, click the Accessibility Options button and you will be able to use the Windows Magnifier and/or the Windows Narrator during setup. The Magnifier lets you magnify portions of the screen; the Narrator reads each screen during setup. Click Next when you're ready to proceed.
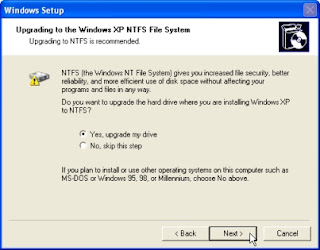
The next screen lets you choose which file system to use. XP runs on NTFS (NT File System), FAT (File Allocation Table) or FAT32 (FAT 32-bit version). If you pick FAT, Setup automatically uses FAT32 for partitions larger than 2G.
Why should you worry about any of this? Well, Microsoft recommends you should use NTFS, and I agree. This file system provides better reliability and security, manages your hard disk space more efficiently, and offers additional advanced file functions.
How to install Microsoft Windows 2000.
Question:
How to install Microsoft Windows 2000.
Answer:
Below are the steps required to install the standard version of Microsoft Windows 2000. It is important to realize that some computer manufacturers have their own proprietary install of Windows 2000 on a Recovery or Restore disc. Therefore, the below steps may not all apply to how Windows 2000 is installed on your computer. If the below steps do not apply to how Microsoft Windows 2000 is installed on your computer and you are unable to correctly reinstall Windows 2000, it is recommended you contact your computer manufacturer for additional help; Computer Hope will not know how to install Windows using your manufacturer's CD.
The standard Microsoft Windows 2000 CD is bootable. Therefore, start by placing the Windows 2000 CD in your computer and reboot.
As computer boots it may prompt you to press any key to boot from CD. Press any key. If you do not get this prompt or are unable to boot from the CD, please refer to document CH000217 for information on how to boot from a CD.
When prompted, press the enter key to setup Windows.
If you agree with the license agreement, press the F8 key.
If a previous Operating System was on the computer that you do not wish to keep, it is recommend you delete the partition before installing Windows. To delete the partition, select the partition you wish to delete and press the D key and then if you are sure, the L key.
Once the partition has been deleted, press the C key to create a new partition; specify the size of the partition you wish to create, by default this should be the maximum size of the partition.
Select the partition you want to install windows on and press enter to install, and C to continue with the setup
If you erased the partition, press enter to continue with the formatting of the NTFS file system.
Once the computer has rebooted, do not press any key to boot from the CD and let the computer boot and continue the remainder of the install for Windows 2000.
Complete the remainder of the setup by filling out or setting each of the remaining questions and/or options.
After Microsoft Windows 2000 has successfully completed the installation, it is recommended that you update your drivers and you update Windows through Microsoft's Windows Update. Additional information about how to do this can be found on document CH000545.
Tuesday, November 20, 2007
First Assignment
processor
- A processor is the logic circuitry that responds to and processes the basic instructions that drive a computer.
The term processor has generally replaced the term central processing unit (CPU). The processor in a personal computer or embedded in small devices is often called a microprocessor.
Thank heaven for the far-thinking propeller-heads who dreamed up internal expansion slots -- the ubiquitous feature on personal computers that helps keep the world safe from massive silicon junk piles.
Most desktop varieties of IBM-compatible and Macintosh computers have at least one expansion slot -- a thin strip that locks an expansion card in place on the motherboard inside your computer. These expansion cards add functions that you might not have been able to use before, including things like sound, a fax-modem, high-resolution graphics or connections to local area networks.
Thursday, November 15, 2007
will find a huge variety of different programs that could help your computer system run more efficiently and quickly. Having the double date rate (DDR) memory for your computer system is by far the greatest type of memory to install onto your computer system because it offers you so many improvements within your computer and to be quite honest, it is very much an affordable type of computer memory to have on your home computer system, for your enjoyment. This type of memory has become much needed for computer users as well as becoming a very popular feature that most would want.
A motherboard is the central or primary circuit board making up a complex electronic system, such as a modern computer. It is also known as a mainboard, baseboard, system board, or, on Apple computers, a logic board, and is sometimes abbreviated as mobo.[1]
Most after-market motherboards produced today are designed for so-called IBM-compatible computers, which hold over 96% of the personal computer market today.[2] Motherboards for IBM-compatible computers are specifically covered in the PC motherboard article.
The basic purpose of the motherboard, like a backplane, is to provide the electrical and logical connections by which the other components of the system communicate.
A typical desktop computer is built with the microprocessor, main memory, and other essential components on the motherboard. Other components such as external storage, controllers for video display and sound, and peripheral devices are typically attached to the motherboard via edge connectors and cables, although in modern computers it is increasingly common to integrate these "peripherals" into the motherboard.